
Designed By Tiger: Easy Build-And-Draw Projects Kids Can Make
Designed By Tiger is a Tiger elective adventure where kids learn a simple engineering loop: plan it, build it, talk about what could be better, improve it, then draw the finished version.
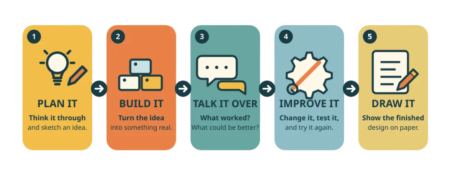
Families can do this at home, or dens can use it as a hands-on activity. The steps below match the current Designed By Tiger Requirements.
What Kids Will Do
Tigers complete all 5 requirements:
- Think of something to build and draw a plan
- Build the project from that drawing
- Talk with their adult partner about improvements
- Make one improvement
- Draw the final project
Supplies You’ll Need
Have parents save up and bring in what you don’t already have:
- Our FREE Designed By Tiger Project Planner and crayons or markers
- Cardboard (boxes, cereal boxes, toilet-paper tubes)
- Tape, glue, or a glue stick
- Kid-safe scissors
- Recyclables (bottle caps, scrap paper, string, popsicle sticks)
- Optional: stickers, paint, or foil for decorating
Pick A Project Idea
Kids can invent their own idea, or start with one of these (both come from the official adventure activities):
Crossing The River
Build a model of something that helps people cross a river—like a bridge, raft, or ferry.
Cub Scout Land
Build a model of an amusement park ride—like a Ferris wheel, roller coaster, or merry-go-round.
Keep it simple. A first-grader’s model does not need to move. It just needs to match their drawing.
Step-By-Step Activity
1. Draw The Plan
Have your Tiger think about what they want to build, then using our Free Project Planner draw what the finished project should look like.
Tips:
- Label the big parts (“bridge,” “wheels,” “ramp”)
- Keep the drawing big and clear
- Don’t worry about perfect art—this is the plan, not the final poster
2. Build From The Drawing
Using the drawing as a guide, build the project with the supplies you have.
Tips:
- Start with the base so it doesn’t tip over
- Tape first, glue later if something needs to dry
- If a part doesn’t match the drawing, that’s okay—note it for the improvement step
3. Talk About Improvements
When the first build is done, the Tiger and their adult partner talk about what could be better.
Ask questions like:
- What part felt wobbly?
- What would make it stronger?
- What would you add if you had five more minutes?
4. Make One Improvement
Pick one idea from that talk and change the project.
Examples:
- Add extra cardboard for support
- Widen the base
- Tape a railing or ramp
- Swap tape for stronger glue
5. Draw The Final Project
Have your Tiger draw the finished version after the improvement.
Compare the first drawing to the last one. Kids love seeing how the idea changed.
Tips For Adult Partners
- Let the Tiger lead the idea, even if it’s silly
- Aim for “good enough,” not perfect
- Celebrate the improvement step—that’s the heart of the adventure
- Save both drawings; they’re great for a Scout binder or fridge gallery
Safety Notes
- Use kid-safe scissors
- Skip hot glue guns for young Tigers unless an adult handles the glue
- Keep small pieces away from younger siblings
Done Checklist
Your Tiger is ready to mark Designed By Tiger complete when they have:
- An original plan drawing
- A built project based on that drawing
- A short improvement talk with their adult partner
- One real change made to the project
- A final drawing of the finished project
For the full requirement wording and adventure overview, see our Designed By Tiger Requirements page.
Want more easy Cub Scout activity ideas? Join our email list and we’ll send printables and meeting helpers straight to your inbox.


